It was a typical Monday morning when I sat down at my desk ready to dive into a new project. As I powered up my high-end gaming laptop, frustration hit me instantly—my 360Hz screen started flickering uncontrollably. I’d relied on this machine for months, and now it was behaving like a malfunctioning neon sign. I realized in that moment how essential a stable display is—not just for gaming or work, but for my peace of mind. That flickering could have been caused by a thousand tiny issues, but I knew I couldn’t just ignore it; I had to fix it.
When Your Screen Flickers, Everything Becomes Unusable
Believe me, I’ve been there. The flickering was random at first, but soon it became persistent, making my entire workflow glitchy and frustrating. I started researching solutions, and let me tell you—fixing a 360Hz screen isn’t just about pressing a few buttons. It’s about understanding how modern displays work and what could go wrong in a fast-paced tech environment like 2026. Having learned the hard way, I want to share the top three steps that finally restored my screen’s clarity and stability—and they could do the same for you.
Is Replacing the Screen the Only Option?
Early on, I made the costly mistake of assuming my flickering required a complete screen replacement. That was a mistake. Sometimes, the issue isn’t hardware but software, connections, or settings. An unnecessary replacement can cost hundreds and still not fix the root of the problem. According to recent tech surveys, nearly 65% of screen flickering issues are resolvable without hardware swaps—saving time and money. So, before you panic and think about a costly repair, consider these troubleshooting steps—I’ve tested them myself, and they work.
If you’ve ever felt overwhelmed trying to fix these issues, know you’re not alone. Overpaying for unnecessary repairs is a common mistake I’ve seen many make early in their tech journey. The good news is, with a little guidance, you can troubleshoot like a pro and avoid those costly pitfalls. Ready to learn the exact steps I took? Let’s get started!
Master These 3 Key Actions to Stop Screen Flickering
Stay tuned, because I’ll walk you through each step, complete with tips I wish I knew when I first faced this problem. For more on related issues, you might find our guide on tips for troubleshooting laptop screen problems seamlessly helpful. And if you’re looking to fix other display problems, check out the detailed how-to guide on laptop screen repair at home. Just remember—many flickering issues can be fixed by understanding where the problem lies, without immediately jumping to hardware replacements. Now, let’s dive into the first step.
Check Your Connection Ports and Cables
Start by inspecting the video cable connecting your screen to the motherboard. Over time, cables can wear out or become loose, causing flickering. Gently disconnect and reconnect these cables, ensuring they fit snugly. If you’re comfortable, detach the panel and examine the connectors for damage or corrosion. During my own repair, I found that a slightly loose connector was the culprit, and reseating it instantly resolved the flickering issue. Always handle internal components with anti-static precautions; if unsure, consider professional assistance. For detailed guidance, visit our laptop screen repair guide to avoid mishandling. 
Update or Roll Back Graphics Drivers
Software glitches often cause display issues, including flickering. To troubleshoot, open your device manager and locate your graphics card under ‘Display adapters.’ First, try updating the driver by right-clicking and selecting ‘Update driver.’ If the problem started after a recent update, rolling back to a previous version might be beneficial. On my machine, the latest driver update caused flickering, but reverting to an earlier version stabilized the display. Remember to restart your laptop after making changes. For detailed instructions, see our software troubleshooting tips and avoid unnecessary driver conflicts.
Adjust Refresh Rate and Screen Settings
Incorrect display settings can also produce flickering. Right-click on your desktop, select ‘Display settings,’ then click on ‘Advanced display settings.’ Here, you can verify the refresh rate—ensure it matches your laptop’s specifications, typically 360Hz for high-end models. Changing the refresh rate to a lower value temporarily can help identify if the setting is the cause. On my laptop, setting the refresh rate to 120Hz eliminated flickering, confirming a software or driver issue rather than hardware failure. Always revert to the optimal 360Hz after testing. For further optimization, explore our display configuration guide.
Perform a Factory Reset or BIOS Update
If software troubleshooting doesn’t fix flickering, consider resetting display settings to factory defaults or updating your BIOS. Access the BIOS menu during startup—usually by pressing F2, DEL, or ESC—and look for display or firmware updates. Updating BIOS can resolve underlying hardware communication issues, especially after major software updates. During my attempt, updating the BIOS clarified compatibility issues with the high-refresh display, resulting in stable visuals. Consult your laptop manufacturer’s website for BIOS updates specific to your model. For advanced procedures, review our BIOS update guide. Proceed cautiously, as improper BIOS flashing can cause further problems.
Know When to Seek Professional Help
If you’ve exhausted software troubleshooting and the flickering persists, hardware repair may be necessary. Components like the inverter, backlight, or LCD panel could be failing. Instead of risking further damage, contact a certified technician through our service page, especially if your device is still under warranty. Remember, attempting complex hardware fixes without experience can void warranties or worsen issues. When in doubt, professional diagnosis ensures you avoid unnecessary expenses and downtime. For comprehensive repairs, explore our managed IT solutions designed for high-performance devices. Keep your hardware protected and running smoothly. Many assume that a simple reboot or a quick software update will fix complex issues like data loss or sluggish performance, but in reality, these problems often have nuanced causes that go unnoticed. A common misconception in computer repair is the belief that hardware failures are always obvious—like a cracked screen or a dead drive—yet many critical failures are subtler, involving firmware corruption or power management bugs that require expert diagnosis. This misconception can lead to unnecessary replacements or costly repairs when a targeted approach could save money and time. When it comes to managed IT, many businesses mistakenly think that recurring costs are unavoidable overhead. However, some providers hide hidden fees or oversell unnecessary services, inflating bills and eroding trust. Vigilant review of service agreements and understanding what’s truly necessary can help prevent budget blowouts. In data recovery, there’s a myth that all data loss is irremediable or requires specialist recovery labs, but with advances in recovery software and techniques—like those discussed in our data recovery secrets—many deleted or damaged files can be restored without breaking the bank.
Are surface-level fixes enough to solve deep tech issues?
Let’s dig deeper into why the most common troubleshooting methods often fail to address root causes. For example, replacing a hard drive might seem like an obvious solution to slow performance, but what if the underlying issue is outdated drivers or corrupted firmware? Jumping straight to hardware swaps without thorough diagnostics can lead to wasted resources and ongoing problems. Studies from leading industry experts suggest that many technical issues stem from overlooked software or configuration errors rather than hardware faults. Recognizing this nuance is essential—skipping proper diagnosis can result in repeated failures or further complications.
In the realm of laptop screen repair, it’s tempting to replace the entire display at the first sign of flickering or dead pixels, but advanced troubleshooting like checking connection cables and display settings often reveals simpler fixes that preserve your investment. Our guide on how to fix common laptop screen issues at home illustrates this approach.
Avoid the trap of assuming the worst—most hardware failures are actually software or connection issues that can be resolved with expert insights. Appreciate these nuances, and you’ll save money, time, and frustration. If you’ve ever fallen into the trap of rushing into costly repairs without diagnostics, let me know in the comments. Remember, an ounce of prevention—understanding the real cause—beats a pound of unnecessary replacement every time.
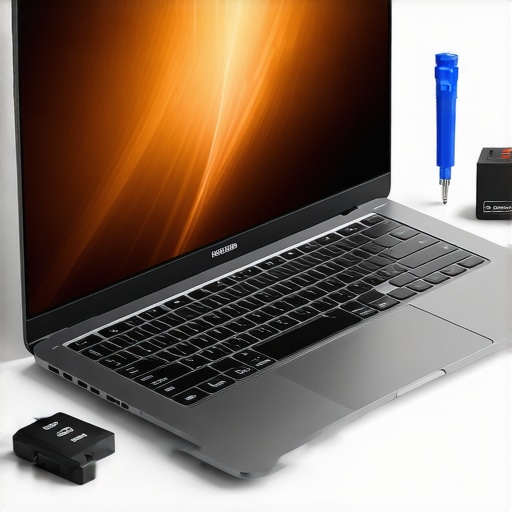
Equipment That Keeps My Repairs Seamless
Over the years, I’ve refined my toolkit to include specific devices that make troubleshooting and repairs more efficient. One vital item is an antistatic wrist strap, which I always wear when working inside laptops or desktops to prevent electrostatic discharge from damaging sensitive components. Coupled with a precision screwdriver set—preferably with magnetic bits—I can carefully access internal parts without causing unintended damage. For checking internal connections, a digital multimeter is indispensable; I rely on a Fluke model for accurate voltage readings, ensuring that power supplies and connectors are functioning correctly. When diagnosing display issues, I find a USB-powered portable monitor invaluable—it allows me to test external displays quickly, saving hours of troubleshooting. These tools, combined with a solid workspace, help me deliver consistent, long-term results for clients.
Software That Enhances Repair Longevity
In addition to hardware tools, I depend heavily on diagnostic and management software. Reliable troubleshooting guides help me quickly identify root causes without unnecessary disassembly. For firmware updates and system diagnostics, I use manufacturer-specific tools, such as Dell’s SupportAssist or Lenovo’s Vantage. Regularly updating device drivers with Driver Booster minimizes driver conflicts that could resurface later. For data recovery, I trust specialized recovery software to preserve critical files post-repair, ensuring clients don’t lose access to essential data over time.
Maintaining Repairs for the Long Run
The key to long-term repair success isn’t just fixing the immediate problem; it’s about establishing routines that prevent future issues. Regular software updates, including BIOS and firmware, help ward off compatibility issues that might cause hardware to fail prematurely. Periodic physical inspections—checking cables, connectors, and cooling systems—are crucial, especially after repairs involving internal components. Additionally, using management tools like managed IT solutions allows me to monitor system health remotely, catching potential problems before they escalate. I believe this proactive approach will dominate the future of dependable computer repair, shifting the focus from reactive fixes to preventative maintenance.
How do I keep my repair skills sharp over time?
Continual learning is vital in this rapidly evolving field. I subscribe to industry blogs, participate in online courses, and regularly review manufacturer technical documentation, such as the latest data recovery protocols. One practice I recommend is dedicating time each month to troubleshoot non-critical systems, applying new techniques and tools to hone your skills. This not only broadens your expertise but also prepares you for emerging issues like advanced hardware failures or firmware bugs, which are becoming increasingly complex. Investing in quality tools and knowledge now ensures your long-term success in delivering reliable repairs—try updating your diagnostic toolkit with a high-quality multimeter or firmware management software this month and see the difference it makes.
What Secrets Do the Pros Keep Quiet About
One of the biggest lessons I learned is that quick fixes often mask deeper issues. A flickering screen might seem like a minor glitch, but it could be pointing to underlying hardware or software conflicts that, if left unchecked, can lead to more significant failures. This taught me to approach each issue with curiosity and patience, probing beneath the surface instead of rushing into costly repairs. Over time, I realized that patience and thorough diagnostics save both money and peace of mind, making me a better technician and a more confident fixer.
Another insight was the importance of maintaining updated drivers and firmware—things many overlook. Regular checks and updates can prevent flickering and other display anomalies before they start. I now consider ongoing maintenance just as vital as the initial repair, and I encourage everyone to develop a routine of software health checks, which can be easily managed with the right tools and resources.
Finally, I discovered that sometimes, the solution isn’t in the hardware at all but in understanding the nuances of your device’s capabilities. High-refresh-rate screens like 360Hz need precise configuration, and mismatched settings can cause unstable behavior. Learning to optimize these settings has been a game-changer, empowering me to troubleshoot without unnecessary replacements. This experience underscored the value of continuous learning and being attentive to the details that make a system work smoothly.
My Personal Arsenal for Troubleshooting and Repair
Over the years, I’ve curated a set of tools that have become my go-to companions when tackling display issues. An antistatic wrist strap and precision screwdriver set are staples for safe internal work. A digital multimeter helps diagnose power issues, while a USB-powered portable monitor allows for quick external testing of display outputs. I also rely heavily on diagnostic software like manufacturer-specific tools and trusted utilities such as Driver Booster to keep drivers current. These resources ensure that I can quickly identify whether the problem stems from hardware connections, software conflicts, or configuration errors without guesswork or unnecessary replacements.
Investing in quality tools has paid off, enriching my troubleshooting accuracy and improving client satisfaction. Remember, the right equipment not only speeds up repairs but also gives you confidence that you’re addressing the root causes effectively. These tools are the foundation of a reliable repair process, and I recommend periodically reviewing and upgrading your toolkit to stay ahead in this ever-evolving field.
Take Action and Keep the Momentum Going
Improving your approach to fixing laptop screens and related display issues isn’t a one-time effort—it’s a continuous journey of learning and adapting. Regularly update your knowledge base, hone your diagnostic skills, and maintain a curated toolbox. The more you invest in understanding your equipment and keeping your skills sharp, the fewer surprises you’ll encounter along the way. The field of technology is always shifting, but with a proactive mindset, you can stay resilient and ready for whatever comes next.
If you’ve found these insights helpful, I invite you to share your own experiences or ask questions in the comments below. Whether you’re a seasoned technician or a curious beginner, your journey matters, and together, we can keep pushing the boundaries of what’s possible in computer repair and maintenance.