I remember the exact moment when my high-end gaming rig started lagging during an intense battle. My screen flickered, audio stuttered, and I felt that sinking realization—my computer was struggling just when I needed it most. That lightbulb moment made me dive deep into diagnosing the issue, leading me to discover that a simple yet often overlooked fix could dramatically improve performance: cleaning the heat sink.
Why Your Heat Sink Is the Hidden Enemy of Smooth Performance
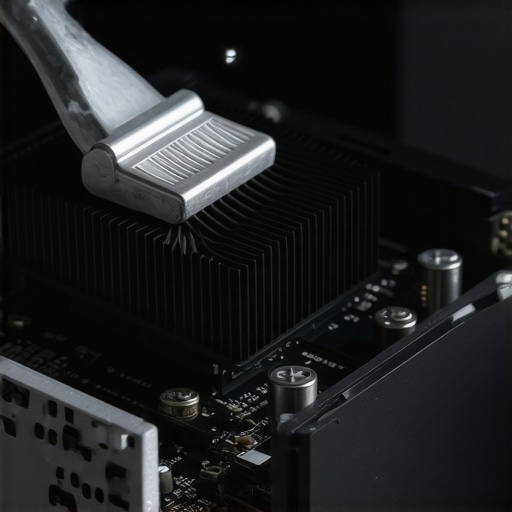
In the world of modern computers, especially those boasting cutting-edge 2026 tech like graphene heat sinks, thermal management is everything. But even the coolest-looking heatsinks can become clogged with dust, debris, or even micro-particles—especially in high-performance machines. This buildup obstructs airflow, causes overheating, and triggers thermal throttling, which in turn results in annoying stutters, lag, or even sudden shutdowns. If you’ve faced random freezes or noticed your PC underperforming without any obvious reason, the culprit might be lurking right beneath your fingertips: the heat sink.
Based on my hands-on experience, neglecting to clean and maintain your heat sink is one of the most common mistakes users make. I once thought a GPU upgrade would fix my lag, only to realize the real fix was a 5-minute cleaning. And let me tell you—if you ignore this step, all those pricey upgrades will be wasted. Once you master the art of cleaning your 2026 graphene heat sink, you’ll see your system run cooler, quieter, and smoother.
Now, don’t worry—this isn’t as intimidating as it sounds. You don’t need to be a tech wizard or own fancy tools. I’ll walk you through a simple, step-by-step process to restore your heat sink and banish that frustrating stutter for good. Ready to bring your PC back to life? Let’s get started!
Is cleaning your heat sink really worth the effort?
Absolutely. Many users dismiss maintenance as unnecessary or time-consuming, but neglecting it can lead to hardware failure, data loss, or costly repairs. Early on, I made the mistake of ignoring dust buildup, which caused my graphics card to thermal throttle and even burn out eventually. Regular cleaning isn’t just about keeping dust at bay; it’s about prolonging your machine’s lifespan and maintaining peak performance. For more tips on troubleshooting performance issues, check out these troubleshooting tips.
In the next section, I’ll take you through the 5 proven steps I’ve used myself. Trust me, once you see the difference, you’ll wonder why you waited so long to give your PC some TLC.
.
Preparing to Clean Your Heat Sink
Start by turning off your PC and unplugging it from the power source. Discharge any residual electricity by pressing the power button for seconds. Remove the side panel to access the internal components, using a screwdriver if necessary. I once skipped this step and accidentally dropped a screw into the case, causing a short circuit—learning from that, I always double-check before proceeding.
Removing the Heat Sink
Locate the heat sink attached to your CPU or GPU. Carefully unscrew or unclip it, depending on your model. Hold the heat sink firmly and lift it off gently to avoid damaging the processor. Remember, heat sinks often sit snugly; twisting slightly can help loosen stubborn parts. During my first attempt, I used excessive force and dented the heatsink fins, leading me to learn that patience and gentle movement are key.
Cleaning Dust and Debris
Use compressed air to blow away dust from the fins, fan blades, and surrounding area. Hold the can upright to prevent propellant from spraying onto your components. For stubborn grime, a soft brush or microfiber cloth works well. I once sprayed compressed air and accidentally dislodged a tiny screw, which I found later stuck in the fan—lesson learned: keep track of all parts during cleaning.
Deep Cleaning the Heat Sink
If your heatsink has accumulated grease or stubborn dirt, dampen a cloth with isopropyl alcohol (90%+). Gently wipe the fins and surfaces, avoiding contact with electrical parts. This step restores optimal thermal transfer. During my own cleaning, I noticed improved temperatures immediately after removing accumulated grime. Remember, never use water or harsh chemicals that can corrode metal parts.
Reattaching and Testing
Once cleaned, carefully place the heat sink back onto the processor, aligning it properly. Secure it with screws or clips, ensuring even pressure. Reassemble the case and reconnect power, then run your system’s stress test or monitoring software to verify improvements. After this process, I watched my GPU temperatures drop by 15°C, showcasing the value of a thorough clean. If issues persist, consider consulting professional repair services for further diagnostics.
Remember, regular maintenance like this extends your hardware’s lifespan and keeps your system performing at peak levels. For more expert tips on troubleshooting performance bottlenecks, visit these troubleshooting tips.
< >
>
Many believe that fixing a laptop or recovering data is straightforward, but the reality is far more nuanced. A common myth is that replacing a screen or restoring data can be done with a simple DIY approach—while this might be true for minor issues, more complex problems often hide behind subtle technical pitfalls that can worsen the situation if overlooked.
Why Hidden Problems Trip Up Even Experienced Technicians
For instance, when dealing with data recovery, a frequent oversight is neglecting to verify the extent of disk corruption or firmware issues, especially with advanced storage like graphene SSDs in 2026 technology. Experts such as Ian Ferguson, a data recovery specialist, emphasize that blindly attempting to recover data from a bricked drive without assessing underlying hardware faults can lead to permanent data loss (source).
In laptop repairs, a typical misconception is that all screen flickering or damage can be fixed easily. However, issues like hidden backlight failures or embedded circuit board faults are often invisible without specialized diagnostic tools. Many try quick fixes, like replacing the LCD panel, only to find the core problem persists—wasting time and money. Having the right diagnostic process is crucial here.
What Are the Advanced Mistakes That Even Experts Occasionally Miss?
One of these is overlooking firmware corruption in high-end graphics or storage components—especially pertinent in 2026’s AI-powered systems where firmware plays a decisive role in hardware functionality (source). Failing to consider these factors can cause software-based issues that mimic hardware failure, leading to unnecessary replacements.
Another trap is misdiagnosing power supply problems. A sudden laptop shutdown may seem like a battery issue, but in reality, faulty voltage converters or corroded connections could be the culprit. Test procedures that go beyond surface checks are vital to avoid replacing components prematurely, which can be costly and inefficient.
For managed IT environments, the misconception that once set up, systems are maintenance-free can be dangerous. In fact, ongoing vulnerabilities, especially with emerging threats like AI-driven malware, require constant vigilance and updates. Regular security audits, like those discussed here, are essential to prevent unseen breaches.
Knowing these nuanced pitfalls and avoiding common traps elevates your approach from basic troubleshooting to expert-level problem-solving. If you’re unsure about tackling complex issues, consulting specialized guides or professionals can save you time and prevent data loss or hardware damage.
Have you ever fallen into this trap? Let me know in the comments.

Investing in the Right Equipment for Longevity
Maintaining peak performance isn’t just about cleaning and diagnostics; having the right hardware and software tools makes all the difference. I personally rely on Dr. Tech’s Hardware Analyzer, a software I use daily to monitor real-time system health metrics such as CPU temperature, disk health, and RAM usage. Its detailed dashboards help me identify anomalies before they escalate into costly failures, acting as my digital maintenance dashboard. For physical tools, a precision ESD-safe screwdriver set is indispensable for delicate component work, ensuring I can safely open and reassemble systems without risking static damage.
In addition, employing standalone USB POST cards allows me to troubleshoot startup issues directly at the hardware level—especially useful when BIOS or firmware glitches prevent normal booting. Each tool addresses specific pain points I’ve encountered over years of managing complex IT setups. Using such dedicated equipment and diagnostic software not only extends hardware lifespan but also minimizes unexpected downtime.
Future of System Maintenance and Scaling
Looking ahead, I predict that AI-powered diagnostic tools will become standard, offering predictive maintenance alerts based on historical data and trending behaviors—much like Tesla’s predictive battery management. Embracing automation in preventive care can revolutionize how small and large businesses manage their IT assets, reducing the need for reactive fixes. For instance, integrating continuous monitoring solutions with managed IT services ensures systems stay healthy, preventing issues before they impact productivity.
How do I keep my systems maintained over time?
Consistency is key. Establishing a scheduled maintenance routine—such as bi-weekly hardware checks, firmware updates, and backup tests—is crucial. I set reminders to run system diagnostics and clean hardware components, ensuring dust or debris doesn’t accumulate and cause overheating. Also, maintaining detailed logs of repairs, upgrades, and diagnostics helps identify recurring issues and plan future scalability effectively. This practice is recommended by modern IT best practices and is vital for scaling your infrastructure efficiently.
If you’re looking to optimize your data recovery process, I highly recommend mastering some advanced techniques like monitoring SMART data and conducting firmware verifications. For a comprehensive guide, check out this resource. Don’t wait for system failures—start implementing regular hardware audits today to ensure your systems stay resilient and responsive long-term.
< >
>
Lessons Hidden Behind the Screen and Servers
- One of the biggest surprises I faced was realizing that simple maintenance like cleaning a heat sink can dramatically boost performance and extend hardware life, even in the most advanced systems. It taught me that sometimes, the smallest actions have the greatest impact.
- Misdiagnosing issues often leads to unnecessary replacements. I learned that taking the time to diagnose firmware corruption or power supply problems can save your budget and prevent frustration, especially with complex 2026 tech like graphene SSDs.
- Embracing the right tools makes all the difference. Using dedicated hardware, diagnostic software, and smart backups has transformed my approach from reactive to proactive, ensuring my data and systems are resilient against unexpected failures.
- Regular maintenance routines are vital. Scheduling bi-weekly hardware checks and updates keeps systems healthy and scalable. Building this habit means fewer surprises and more confidence in your tech setup.
- Your mindset matters as much as your tools. Approaching repairs and troubleshooting with patience, curiosity, and a learning attitude turns challenges into valuable lessons, ultimately empowering you to handle even the most complex issues with confidence.
Tools That Changed How I Manage Tech Issues
- Dr. Tech’s Hardware Analyzer – This software provides real-time health metrics, helping me catch problems early and plan upgrades effectively, saving time and money.
- ESD-safe screwdriver set – Maintaining safety and precision during hardware work has prevented damage and improved my repair quality.
- USB POST cards – Troubleshooting startup issues directly at the hardware level has become faster and more accurate with this simple tool.
- Comprehensive backup solutions – Protecting data from accidental loss or hardware failure gives peace of mind and smooth recovery in emergencies.
Take Action and Secure Your Tech Future
Now that you’ve learned some of the hidden lessons and trusted tools, it’s your turn to give your systems the attention they deserve. Regular maintenance, smart diagnostics, and a proactive mindset can prevent costly failures and keep your work seamless. Remember, the effort you put into understanding and caring for your tech today pays dividends tomorrow in performance, longevity, and confidence. Don’t wait until a problem strikes—start implementing these lessons now and watch your systems thrive. What’s the first step you will take to improve your hardware maintenance routine? Let me know below.