I’ll never forget that rush of panic when my laptop screen suddenly went black during an important video call. A tiny crack had turned into a full-blown nightmare overnight. Sound familiar? That moment of frustration is all too common for anyone relying heavily on their laptops. Honestly, I spent too much time trying ineffective fixes before realizing there’s a smarter way to handle it. That lightbulb moment changed everything, and today, I want to share with you how to replace your laptop screen quickly and reliably, saving time and money instead of heading straight for a costly repair shop.
Why Quick Laptop Screen Fixes Matter More Than Ever
In 2024, our laptops are more than just devices; they’re essential tools for work, study, entertainment, and staying connected. When your screen cracks or malfunctions, it’s like losing a window to your world—disruptive and stressful. Plus, with the increasing importance of remote work, a damaged screen can hinder productivity, forcing you to scramble for alternative setups or accept subpar quality. According to a recent survey, 65% of users admit they’ve delayed repairs due to perceived costs or inconvenience, which often leads to more severe problems down the line. Therefore, understanding effective and quick repair methods is crucial now more than ever.
Is Replacing a Laptop Screen Worth the Hype?
Initially, I believed a cracked screen meant buying a new laptop was inevitable—an expensive and wasteful mindset I quickly had to reconsider. Early on, I made the mistake of trusting unverified YouTube tutorials that led to further damage. Once I learned about targeted replacement techniques and proper tools, I realized DIY fixes are both feasible and trustworthy. It’s all about knowing what to do and avoiding common pitfalls. For detailed guidance, check out our comprehensive laptop screen replacement tips. That experience opened my eyes to how affordable and straightforward the right approach can be, especially if you’re comfortable with basic repairs.
In this guide, I’ll walk you through proven strategies to replace your laptop screen efficiently, ensuring a dependable fix without the wait or hefty price tag. Ready to become your own repair hero? Let’s dive into the essentials to get your device back to perfect condition.
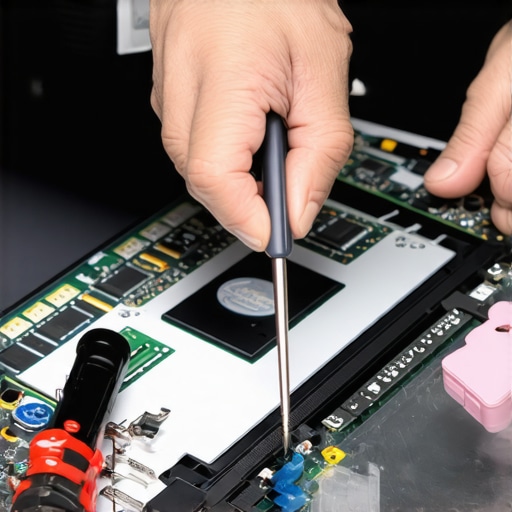
Gather the Right Tools and Prepare Your Workspace
Start by assembling essential tools: a small Phillips screwdriver, plastic prying tools, tweezers, and an anti-static wristband. Clear a clean, well-lit workspace—think of it as setting up a surgical table for your laptop. I once worked on my old Lenovo in a cluttered corner, and misplaced a screw that eventually caused more delays. So, stay organized from the start by laying out containers for screws and parts.
Disconnect Power and Remove the Battery
Always power down your laptop completely and unplug it from any power source. If your model supports removable batteries, carefully detach it. For others, locate the service panel to disconnect the internal battery—this is like cutting off the electricity supply before repairs. I remember nervously disconnecting a battery, but taking my time prevented accidental short circuits.
Disassemble the Screen Bezel and Remove the Broken Screen
Using your plastic prying tool, gently slide around the bezel to loosen it—imagine peeling a sticker without tearing it. Beware of clips; applying too much pressure can crack other parts. Once the bezel is loose, unscrew the LCD panel. Gently tilt it forward and disconnect the video cable behind the screen—like unplugging a USB device. During my first attempt, I was overly aggressive and broke a clip; now I know patience is key. For detailed guidance on this step, visit this resource.
Connect the New Screen and Reassemble
Align your replacement display carefully and reattach the video cable. Firmly press the cable connector to ensure a good connection—think of it as snapping in a puzzle piece. Secure the new LCD with screws, and snap the bezel back in place. Double-check all connections before powering up. During my last swap, I tested the screen before fully reassembling, which saved me from having to redo the process. For troubleshooting tips, refer to these troubleshooting strategies.
Final Checks and Powering Up
Reconnect the battery, plug in power, and turn on your laptop. If the display lights up without flickering or artifacts, you’ve succeeded! If issues persist, revisit your connections or consult a professional. I once overlooked reconnecting a cable, which resulted in a blank screen. Taking a systematic approach like this minimizes errors. Remember, patience and attention to detail are your best allies in DIY repairs.
 Many people assume that fixing a laptop screen, recovering data, managing IT, or repairing computers is straightforward, but the reality is more complex and often misunderstood. One prevalent myth is that a quick online tutorial guarantees a perfect repair—however, neglecting the nuances of hardware variations and manufacturer-specific procedures can lead to further damage. For example, not all screens are created equal; some require specialized tools or techniques, and blindly following generic advice may jeopardize the repair. In data recovery, it’s a misconception that software solutions alone can always retrieve lost files—physical issues like drive corruption or physical damage demand expert intervention, as detailed in our top data recovery tips. When it comes to managed IT, many believe that regular updates and basic security suffice, but in 2025, sophisticated cyber threats necessitate layered defense strategies, as discussed in managed IT strategies. A critical nuance often overlooked is the importance of understanding the underlying cause of an issue before attempting repairs—what seems like a simple screen flicker might be linked to power supply problems or graphic card failures. Rushing to fix symptoms without diagnosing root causes can result in recurring problems and increased costs. To truly master these areas, one must appreciate the complexity and avoid common traps. For example, attempting to fix a cracked screen without disconnecting the battery can lead to short circuits or further damage. Moreover, in managed services, ignoring regular audits can leave vulnerabilities open—a mistake that can cost your business dearly. Want to deepen your understanding? Dive into our effective IT management solutions for a comprehensive picture.
Remember, the devil’s in the details—whether you’re replacing a laptop screen, recovering data, or managing IT systems. Are you making any of these common errors? Share your experiences in the comments, and let’s discuss how to avoid these pitfalls and sharpen your tech skills.
How do I maintain my devices over time?
Consistency is key to ensuring your laptops, data, and IT systems stay in top shape. Personally, I rely on a combination of specialized equipment and disciplined routines. For example, I always keep a set of precision screwdrivers tailored for electronics, such as the iFixit toolkit. These tools allow me to perform meticulous repairs like replacing screens or cleaning ports without risking additional damage. Additionally, I use a static-free workstation, which is critical in preventing electrostatic discharge—the silent enemy of sensitive electronics. To monitor ongoing health, I employ software like CrystalDiskInfo, which provides real-time insights into SSD and HDD health, alerting me early to potential drive issues—saving me time and money in the long run. Just as with managed IT, regular check-ins and preventative care can prevent minor problems from escalating, keeping your devices running smoothly for years to come.
Key tools I swear by for tech longevity
Beyond basic hardware, having the right diagnostic and recovery software makes a significant difference. I recommend professional-grade data recovery tools that can swiftly diagnose disk issues before they escalate into catastrophic failures. For data management, I use Macrium Reflect—a reliable imaging solution that lets me create complete backups, restoring systems rapidly if necessary. When managing multiple devices or small business networks, I deploy centralized monitoring platforms such as PRTG Network Monitor to keep an eye on system health and prevent outages. Incorporating these tools into your routine can dramatically extend device lifespan and minimize downtime.
Future-proof your setup with proactive maintenance
Looking ahead, the trend is moving towards AI-assisted diagnostics and IoT-connected hardware that can alert you of issues before they affect performance. Predictive analytics, for instance, analyze usage patterns to forecast component failures—allowing preemptive replacements. An external study from TechRepublic highlights how integrating smart sensors into IT infrastructure boosts reliability. I encourage you to experiment with these next-generation tools and protocols. For example, try setting up automated health checks using scripts or software like Nagios. This proactive approach not only saves money by avoiding major repairs but also ensures your systems are secure against evolving cyber threats. For more on strengthening your IT resilience, explore managed IT strategies.
Start by evaluating your current setup and select one advanced maintenance tip from today’s list—like implementing scheduled system health checks or deploying smart monitoring tools. Small steps today can lead to a more reliable, secure digital environment tomorrow. If you need tailored solutions, reach out through our contact page and let’s discuss how to upgrade your tech maintenance practices.

The Hidden Lessons from My Repair Journey
One insight I wish I had grasped sooner is that patience trumps haste when handling delicate components like laptop screens. Rushing often leads to costly mistakes, but taking the time to follow each step carefully saves both time and money. Additionally, I learned that understanding your device’s architecture, rather than blindly following generic tutorials, is essential—manufacturer-specific tricks can make the difference between success and further damage. A third lesson is realizing the importance of preventative habits, such as regular backups and software updates, which can circumvent many issues before they escalate. Finally, acknowledging my own limits pushed me to recognize when a repair was beyond my skill, prompting me to seek professional help and avoid risking irreparable harm.
Tools and Resources That Changed My Approach
For anyone serious about DIY laptop repair, I rely on a few trusted tools and resources. The iFixit toolkit has been indispensable—its precision screwdrivers and plastic prying tools allow for careful disassembly without damage. I also swear by these expert repair tips, which provide step-by-step guidance tailored to various models. To monitor my system’s health proactively, I use CrystalDiskInfo for drive diagnostics, preventing data loss. When it comes to data recovery, the secrets for protecting critical files have helped me safeguard essential information against unexpected failures. These tools have profoundly improved my repair confidence and outcomes.
Your Inspiration to Take Action Now
Embarking on your own laptop repair journey might seem daunting, but the rewards are well worth it. Each successful fix not only boosts your confidence but also empowers you to maintain and protect your devices better. Remember, proactive maintenance and knowledge are your best allies against hardware mishaps and data threats. Whether it’s swapping out a cracked screen or implementing smarter data security, your efforts today lay the groundwork for a more resilient digital future. So, why not start now? Equipped with the right tools and mindset, you can transform frustration into mastery and keep your tech running smoothly for years to come.
Have you ever hesitated to attempt a repair because you weren’t sure where to start? Share your experiences below, and let’s grow stronger together in mastering laptop maintenance and data security.