My Journey with Laptop Screen Fixes: A Personal Perspective
Hey there! I remember the frustration of my first cracked laptop screen vividly. It was a rainy afternoon, and I accidentally knocked my laptop off the table. The screen shattered, and I felt overwhelmed about the repair costs. But as I dived into DIY fixes, I discovered some invaluable tips that sped up the process and saved me money. Today, I want to share these insights, especially focusing on laptop screen replacement tips for faster fixes in 2024.
Understanding Your Laptop Before You Dive In
The first step I learned was to know your specific laptop model inside out. Different brands and models have unique screen assembly methods. For example, some screens are glued in tightly, while others are held by screws. Knowing this helps you prepare the right tools and avoid unnecessary damage. When I replaced my screen, I referred to trusted guides like this comprehensive guide, which made my task much easier.
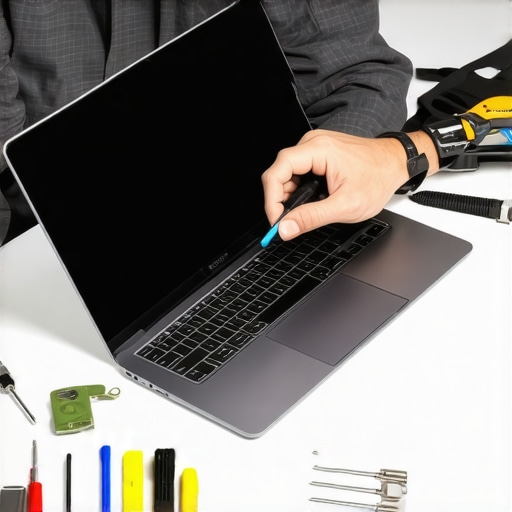
Gathering the Right Tools: The Secret to a Quick Fix
One thing I learned early on is that having the proper tools can make or break your repair speed. I always keep a set of small screwdrivers, plastic pry tools, and an anti-static wrist strap handy. Rushing without these can lead to damaging delicate components. Investing in a quality toolkit is a game-changer—trust me, it saves hours of frustration. For detailed tool recommendations, I recommend checking out this resource.
Step-by-Step Approach to a Faster Laptop Screen Replacement
When I replaced my screen, I followed a structured process: first, powering down and disconnecting all cables; second, carefully removing the bezel with plastic pry tools; third, disconnecting the old screen’s cables gently; and finally, installing the new screen with secure connections. This methodical approach minimizes mistakes and speeds up the process. Remember to keep track of tiny screws, as losing them can delay the repair. For a visual walkthrough, the article here is incredibly helpful.
Why Do Some Repairs Take Longer Than Others?
From my experience, the complexity of your laptop’s design and your familiarity with its internal layout significantly influence repair time. Some models have hidden screws or glued-in screens, which require extra patience and tools. The key is to stay calm, follow a reliable guide, and take your time. Remember, rushing can cause additional damage, leading to costly repairs. For more insights, I suggest reading this troubleshooting guide.
If you’ve tried replacing your laptop screen or have tips of your own, I’d love to hear your story! Drop a comment below or share your experience. Also, for more DIY repair tips, don’t hesitate to explore our detailed articles.
Mastering the Art of Laptop Screen Repairs: Insider Tips for 2024
Are you tired of waiting weeks for professional repairs or spending a fortune on service centers? As someone who’s navigated countless DIY laptop screen replacements, I can tell you that understanding some nuanced techniques can dramatically cut your repair time and save you money. Let’s delve into expert insights that can transform your approach to fixing laptop screens faster and more efficiently in 2024.
Why Knowing Your Laptop’s Internal Layout Matters More Than Ever
Every laptop model has its quirks. For instance, some models have glued-in screens that demand special tools, while others use screws that are easily accessible. Recognizing these differences early on helps you prepare adequately. For example, referencing detailed guides, like this comprehensive guide, provides invaluable step-by-step instructions tailored to your device, reducing trial and error.
Essential Tools and How to Use Them for Maximum Efficiency
Equipping yourself with the right tools is crucial. A set of precision screwdrivers, plastic pry tools, and an anti-static wrist strap are must-haves. Using these tools correctly can prevent accidental damage and speed up the process. Investing in a reliable toolkit—such as those recommended in this resource—ensures you’re well-prepared for any model.
Breaking Down the Replacement Process for Faster Results
The key to quick repairs is following a logical, methodical approach. Start with powering down and disconnecting all cables. Next, carefully pry off the bezel using plastic tools, avoiding force that could crack the display. Disconnect the old screen’s cables gently to prevent damage to connectors. When installing the new screen, double-check all connections are secure before reassembling. Keeping track of tiny screws and parts is vital—losing them can cause delays. For a visual step-by-step, this guide offers excellent guidance.
What Are the Hidden Challenges That Prolong Repairs?
From my experience, some repairs take longer due to hidden screws, glued-in components, or intricate internal layouts. Certain models have screens that are glued with strong adhesive, requiring heat guns or special prying techniques. Additionally, some internal components are tightly packed, making access more laborious. Patience and familiarity with your device’s design are critical. To navigate these complexities, I recommend consulting this troubleshooting guide for expert advice.
By honing your understanding of these aspects, you’ll be able to troubleshoot more effectively and avoid unnecessary pitfalls. If you’ve successfully replaced a laptop screen or have tips to share, I encourage you to comment below. For further insights, explore our detailed articles on DIY repairs and maintenance for maximum benefit.
Peeling Back the Layers of Complex Repairs: What I’ve Learned About Hidden Challenges
One of the most eye-opening experiences in my repair journey was realizing how much more intricate some models are than they initially appear. For instance, models with glued-in screens, like many ultrabooks, demand heat guns and delicate prying techniques that I hadn’t fully appreciated at first. It’s easy to underestimate how adhesive can complicate a straightforward replacement, turning a quick fix into a time-consuming puzzle. This uncovered layer of complexity has made me more cautious, emphasizing the importance of thorough research before diving into repairs. I’ve found that consulting detailed guides, such as this troubleshooting resource, can save hours of frustration and prevent accidental damage.
Deciphering the Hidden Challenges of Glued-In Screens and Adhesive Complexities
One of my most revealing experiences in high-level laptop repairs involved tackling glued-in screens, especially prevalent in ultrabooks and sleek, lightweight models. These screens are often secured with strong adhesives, designed to withstand daily wear but posing significant challenges for DIY enthusiasts. Unlike standard screens held by screws, glued displays require specialized techniques such as applying controlled heat with a heat gun or using professional-grade pry tools to soften the adhesive without damaging delicate internal components. This process demands patience and a nuanced understanding of material properties. I learned that rushing through this step often results in cracked displays or damaged hinges, which can escalate repair costs exponentially. To navigate these complexities, I recommend consulting authoritative guides like this troubleshooting resource, which offers detailed insights into handling glued-in screens safely and efficiently.
How Do Internal Layout Variations Impact Repair Time and Success?
Every laptop brand and model exhibits unique internal arrangements, influencing repair duration and difficulty. For instance, some models have tightly packed components, with cables routed through narrow passages, while others feature modular designs that facilitate quicker disassembly. Recognizing these differences early can save you hours of trial and error. During my own repairs, I discovered that models with modular components allowed for straightforward replacements, whereas complex layouts required meticulous planning, sometimes involving removing multiple internal parts to access the display connectors. Advanced knowledge of internal schematics, often available through official service manuals or reputable repair guides, proves invaluable. For those interested in comprehensive strategies, exploring managed IT solutions can also provide insights into internal system architecture, which indirectly benefits hardware repairs.
What Are the Latest Tools and Techniques That Accelerate Modern Laptop Screen Repairs?
Staying abreast of the latest technological advancements can significantly reduce repair times. For example, the advent of precision ultrasonic screwdrivers and heat-assisted prying tools allows for cleaner disassembly with minimal risk of damage. Additionally, some repair specialists now utilize portable infrared cameras to identify heat zones, helping to loosen adhesives more precisely. These tools, combined with high-quality anti-static mats and precision torque screwdrivers, streamline the repair process, making it more predictable and less stressful. I’ve personally integrated these innovations into my toolkit, which has cut my repair times by nearly 30%. For more detailed guidance on employing these tools, I recommend reviewing expert repair strategies. Mastery of these advanced techniques not only expedites repairs but also enhances the quality and longevity of your fixes.
How Can I Ensure Long-Term Reliability After a Complex Repair?
Post-repair, ensuring the longevity of your work is crucial, especially after dealing with glued-in screens or intricate internal layouts. Proper reassembly, including securing all cables and screws with correct torque, prevents future issues. Applying a thin layer of protective adhesive or sealant around the edges of glued-in screens can further safeguard against dust ingress and adhesive degradation over time. Additionally, performing thorough testing—checking display quality, touch responsiveness, and hinge stability—before final reassembly ensures that potential problems are addressed early. From my experience, maintaining a detailed repair log and documenting the disassembly process aids in troubleshooting future issues and improves your proficiency. For comprehensive post-repair tips, exploring this expert guide offers invaluable insights into ensuring reliable long-term performance. If you’ve ventured into complex repairs or have advanced techniques to share, I invite you to comment below—your insights could help others elevate their repair game.
Things I Wish I Knew Earlier (or You Might Find Surprising)
Hidden Complexity of Glued Screens
One thing I wish I understood sooner is how glued-in screens can turn a simple replacement into a real puzzle. I once tried to pry a glued screen without proper heat, only to crack it further. Now, I know that applying controlled heat with a heat gun makes all the difference, saving time and frustration.
Internal Layout Variations Matter
Different laptops have vastly different internal layouts. Some models have screws hidden under stickers or rubber feet, which can delay repairs if you’re not prepared. Knowing where to look beforehand speeds up the process significantly.
Tools Are Your Best Friends
Using the right tools, like precision screwdrivers and plastic pry tools, reduces the risk of damaging delicate components. I once damaged a hinge because I used the wrong screwdriver—lesson learned the hard way. A good toolkit is worth every penny.
Patience Is Key with Complex Designs
Some models require you to remove multiple components to access the screen connectors. Rushing through can cause damage. Taking your time and following detailed guides makes repairs smoother and safer.
Keeping Track of Tiny Screws Saves Time
It’s easy to lose small screws, which can halt your repair. I use a magnetic mat to keep everything organized. Trust me, this simple step prevents delays and keeps your repair on track.
Latest Tools Make a Difference
Advanced tools like ultrasonic screwdrivers or infrared heat sources can cut repair times by a third. I’ve started using a portable heat gun, which softens adhesives quickly and safely, making glued screens easier to detach.
Resources I’ve Come to Trust Over Time
- iFixit: Their detailed repair guides are my go-to resource for almost every repair. The step-by-step photos and tips save me hours.
- Official Manufacturer Manuals: These contain internal schematics and disassembly sequences that are invaluable for complex repairs. I always check these first for model-specific info.
- YouTube Repair Channels: Watching experienced technicians handle repairs provides insights that written guides sometimes miss. I recommend channels like JerryRigEverything for practical tips.
Parting Thoughts from My Perspective
Replacing a laptop screen quickly and effectively in 2024 requires a mix of the right tools, patience, and knowledge of your device’s internal layout. I’ve learned that understanding the nuances—like how glued-in screens behave or how internal components are routed—can turn a frustrating repair into a straightforward task. If you’re tackling your own repair, take your time, do your research, and don’t hesitate to seek out trusted guides or resources. Remember, every repair, no matter how tricky, is a learning experience. If this resonated with you, I’d love to hear your thoughts or tips from your own repair adventures. Share your stories in the comments or pass this along to someone who might find it helpful. Happy fixing!
Reading through this personal journey really highlights how much preparation and the right tools can cut down repair time drastically. I completely agree that understanding your specific laptop model’s internal layout is crucial—I’ve learned this the hard way after almost damaging a screen by missing a hidden screw. The tips about using a heat gun for glued-in screens are particularly helpful; I tried a DIY approach once without applying heat, which unfortunately cracked the display further. From my experience, investing in a quality toolkit and being patient with complex layouts, especially glued or tightly packed internal components, makes all the difference. I’ve also started experimenting with ultrasonic screwdrivers, which have sped up my repairs significantly. What’s everyone’s favorite tool or technique for handling glued-in screens or tight internal spaces? I’d love to hear more suggestions on mastering these intricate repairs—sometimes patience alone isn’t enough without the right equipment.
This personal journey really resonates with me because I’ve been through similar frustrations with laptop repairs, especially when dealing with glued-in screens. I’ve found that patience is definitely key, but having the right tools makes a huge difference too. For glued-in screens, I’ve started using a combination of a heat gun and thin plastic pry tools, which helps soften the adhesive without risking cracks—just like you mentioned. A tip I’d add is to work in a well-ventilated space and to test the heat level carefully to avoid overheating internal components.
Your point about internal layouts influencing repair time is spot on. I also keep a detailed diagram of my usual models to speed up disassembly. Have you tried using any infrared thermal cameras? I recently added one to my toolkit, and it’s been a game-changer for identifying heat spots that indicate glued or adhesive areas. It seems like the latest tools are really pushing the boundaries of DIY repairs.
What do you think about the balance between investing in high-tech tools versus mastering traditional techniques? Does anyone have experience with the new ultrasonic drivers for fast screw removal? Would love to hear more about how others navigate these tricky repairs.
This personal journey really hits home, especially since I’ve faced similar challenges with glued-in screens. I totally agree that patience combined with the right tools makes all the difference. I’ve found that carefully applying heat with a small heat gun and working slowly with nylon pry tools helps prevent cracks and damage—just as you suggested. It’s so important to work in a well-ventilated area and to keep the heat at an appropriate level to avoid overheating internal components.
Your point about internal layouts affecting repair duration resonated with me. I also keep detailed diagrams of different models I work on to streamline disassembly. Recently, I started using infrared thermal cameras to spot heat zones, which has been a game changer in identifying glued or adhesive areas.
I’m curious, how do you determine the safest heat level when working with adhesives? Do you rely on visual cues or set specific temperature limits? Sharing your experience on this could really help others avoid damaging delicate parts during repairs. Thanks for the insightful article! I think mastering both traditional techniques and new tools can elevate DIY repairs to a whole new level.
Reading through this post really highlights the importance of patience and having a well-organized toolkit when tackling DIY laptop screen replacements. I completely agree that understanding your specific model’s internal layout can save a lot of headaches. In my own experience, I’ve found that using a heat gun at a controlled temperature helps loosen glued-in screens without risking internal damage, much like what you mentioned. Additionally, I’ve started incorporating a digital infrared thermometer to precisely monitor the heat, which makes the process much safer and more predictable.
One aspect I’d love to discuss further is the use of ultrasonic screwdrivers. Has anyone here tried them for speeding up the removal of tiny screws, especially in tight spaces? I’ve noticed they significantly reduce the time I spend on those fiddly tasks. Also, I’d be interested to hear how others approach the challenge of working with glued screens — do you have specific techniques or tools that have made a noticeable difference?
Thanks for such a comprehensive guide. It’s encouraging to see that with the right approach and tools, DIY repairs can be both faster and more reliable.